
How to auto-DM a link from Instagram comments
Use the setup guide in your workflow editor, then follow the screenshots to refine and test a comment-to-DM automation.
In this article
Choose your Instagram connection, then open the workflow
The starter has one message with a destination button. Add public replies, follow checks, or other steps on the same canvas; the guide does not replace those edits. The editor autosaves changes, and advancing the guide saves before continuing. The screenshot walkthrough below covers the editor's individual controls and the template-gallery entry. In the no-account onboarding preview, this actual editor uses local sample data and simulated publishing. Its conversation preview sends nothing; live Instagram Test and AI actions are unavailable.
- Choose Create an Instagram automation on Home. Before the editor opens, choose Connect Instagram or Continue without Instagram. A ready professional account shows Continue to workflow. Your draft then opens on the canvas at Share; skipping leaves Instagram disconnected until you connect before publishing.
- Choose or create a Smart Link or a published, shareable product to put in the message's button. Add a product saves this workflow before opening product setup and returns with the product selected. If the product is still a draft, choose Finish product setup before continuing.
- Continue to the trigger step. The guide opens the canvas's trigger settings. Choose Post or Reel comments, enter your keywords in Words, and choose All posts, Specific post, or Next post. Selecting an existing post requires Instagram to be connected. You can also choose incoming DMs or Story replies.
- Continue to the message step. Edit the DM and button text in the message's own settings. These are the same steps and settings you can edit directly on the canvas.
- Try the conversation preview and check the Instagram account and destination. Connect Instagram if needed, then choose Review & publish. Review the changes and confirm Publish workflow. A published workflow uses Publish changes for later updates.
- Use Continue on my own to hide the guide and keep editing this canvas. Continue setup reopens it at the saved step. Save & finish later saves your graph and returns to Home. Instagram connection and product setup preserve the same draft. Successful Instagram authorization resumes it automatically; a failed or cancelled connection lets you retry or Continue without Instagram.
What you will build
Someone asks about the mic in your Reel. Instead of pasting the same link again, ask them to comment GEAR. This workflow sends a short Instagram DM with a Get the mic button and replies to their comment. Swap in your own keyword and Link to share a guide, recipe, booking page, or product.
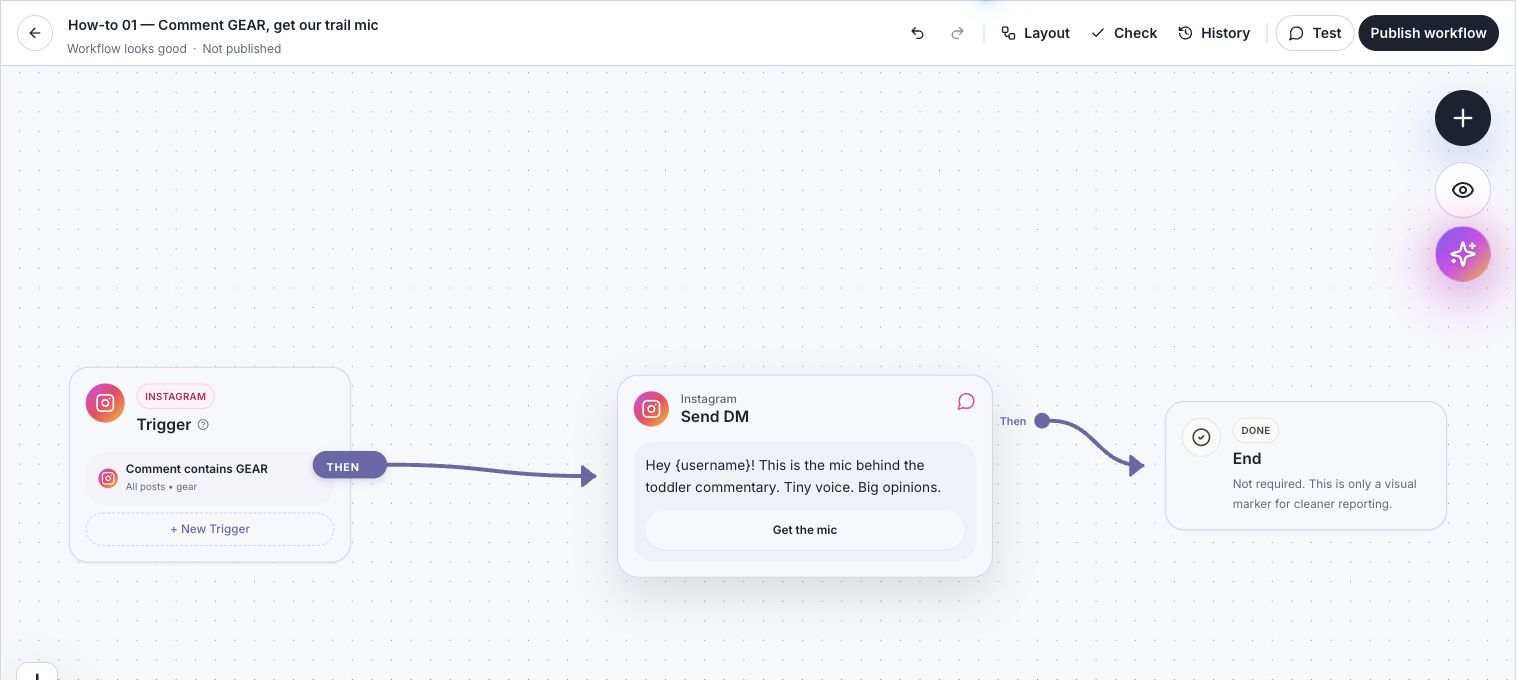
- Workflow: Instagram comment containing gear → Send DM with an Open Link button → End.
- Example: the RoRo Shreds demo workspace, using its existing RØDE Wireless GO II microphone Link.
- These are real screenshots of a saved workflow draft. The demo Instagram connection is inactive, so the workflow remains Not published. Phone previews are simulations, not delivered messages.
Before you start
- Connect your professional Instagram Business or Creator account under Settings → Integrations. Allow the required profile, comment, and message permissions. You can build a draft before connecting, but real post selection, live testing, and publishing need an active connection.
- Create or choose the Link you want to send. This example uses an existing microphone Link. Use your own destination and confirm that it opens the right page.
- Pick one clear caption request, such as: Want the mic behind the toddler commentary? Comment GEAR and I’ll send it over.
1. Start with Send link on keyword
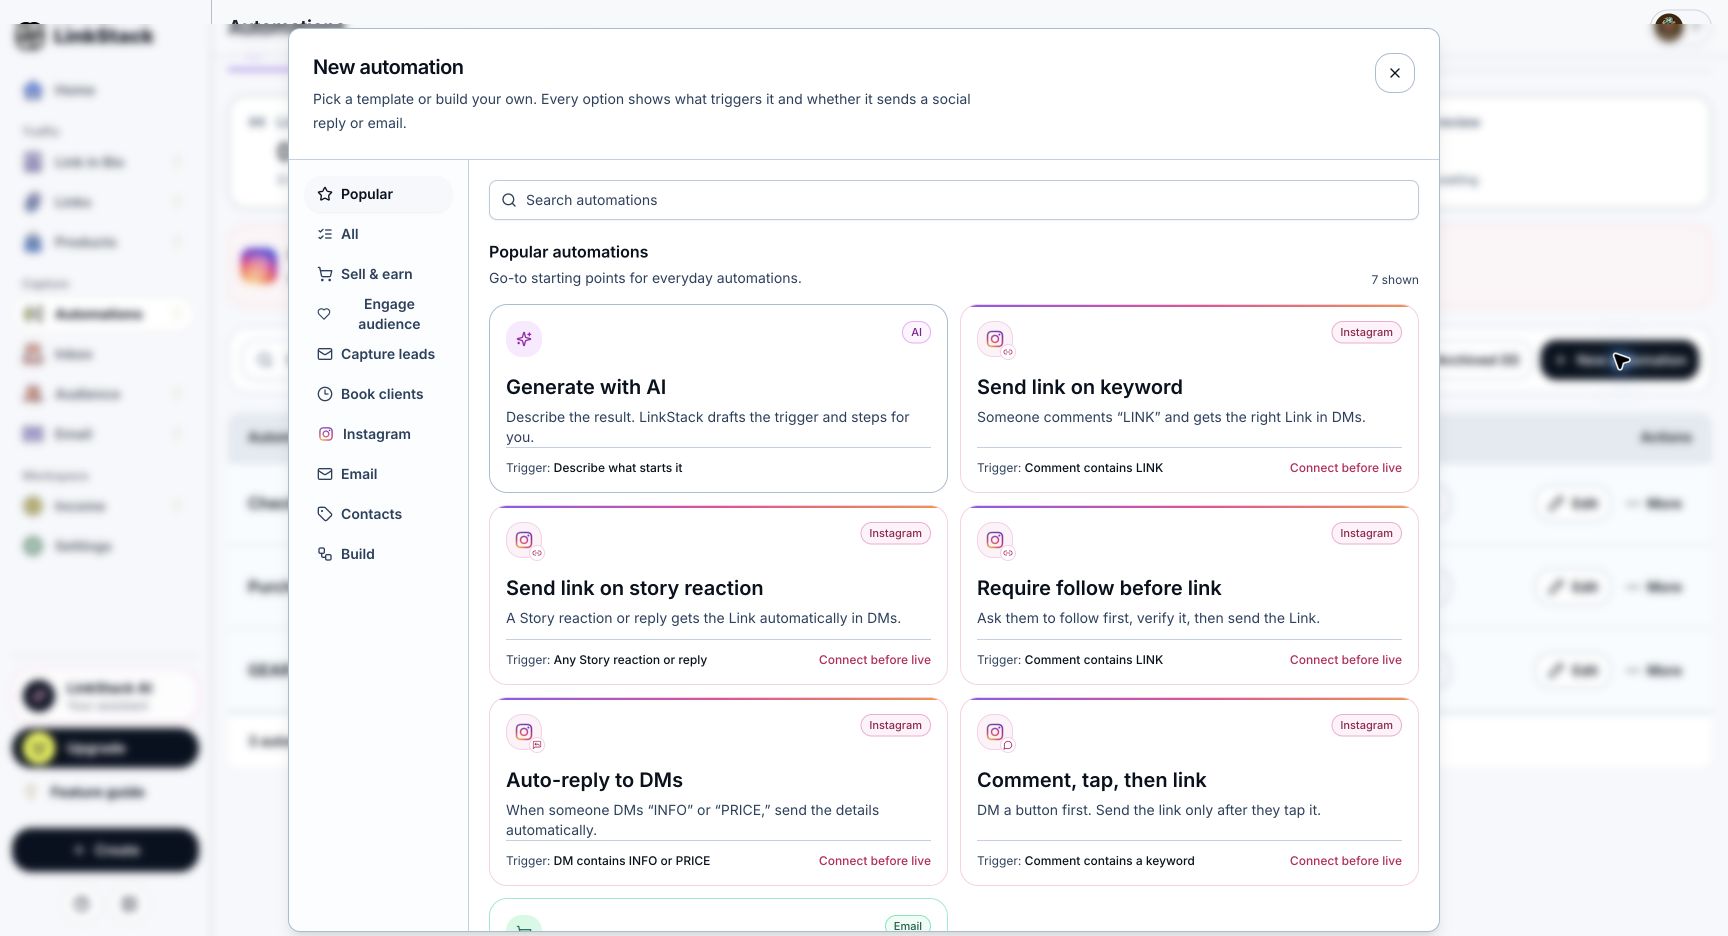
- Open Automations in the dashboard and click New automation.
- Choose Send link on keyword from Popular, or find it with Search automation templates. If you have saved a workflow from this template before, you can also find it in Recent, ordered by most recent use.
- Select the Link people should receive as the destination, then click Use template.
- In the workflow builder, rename the draft to something you will recognize. Our example is How-to 01 — Comment GEAR, get our trail mic.
- Keep the template’s three connected nodes: Trigger, Send DM, and End.
2. Set the comment keyword
Use one memorable keyword for the first version. Add extra words only when you want those comments to receive the same destination. Any comment would send the DM even when someone never asked for the link.
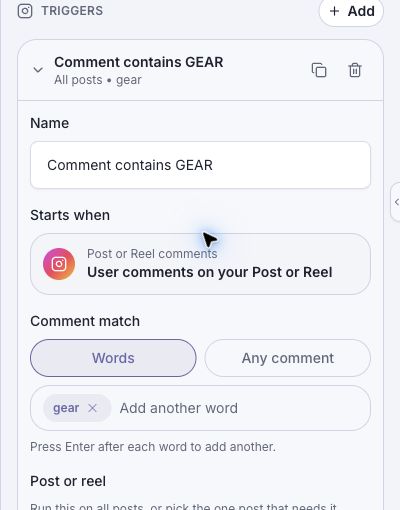
- On the canvas, click Comment contains LINK inside the Trigger node to open its settings.
- Change Name to Comment contains GEAR. The name helps you recognize the trigger; the Words field controls what matches.
- Under Comment match, keep Words selected. Remove link, type gear, and press Enter to add it.
- Keep Starts when set to Post or Reel comments. This recipe listens for comments, not incoming DMs or Story replies.
3. Choose the posts and public reply
LinkStack posts the trigger's public reply only after Instagram accepts the workflow's DM. If the DM is queued, the public reply waits too. If the DM fails or is skipped, LinkStack does not post the confirmation.
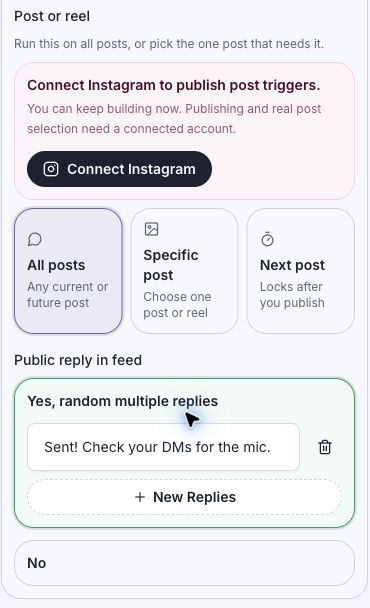
- Scroll down in the Trigger settings to Post or reel.
- This demo uses All posts, so any current or future post can match gear. For a single campaign, choose Specific post and select the intended post or Reel after connecting Instagram. Next post is for the next post you publish.
- Under Public reply in feed, choose Yes, random multiple replies.
- Replace the starter reply with: Sent! Check your DMs for the mic.
- Keep one reply for this example. Use New Replies if you want several variations, or choose No to omit a public reply.
4. Write the DM
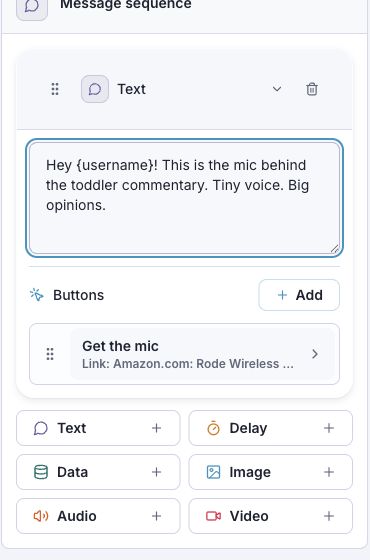
Example DM: Hey {username}! This is the mic behind the toddler commentary. Tiny voice. Big opinions.
- Close the Trigger editor and click the message inside the Send DM node.
- In Message sequence, replace the Text block with the example message or your own short reply.
- Keep the Link button in this text block. One short message and one destination are enough for this workflow.
5. Point the button at the right Link
This is a direct-link workflow: the first DM already contains the destination button. Pressing Get the mic opens the selected Link. A second DM, email collection, or follow check is not part of this recipe.
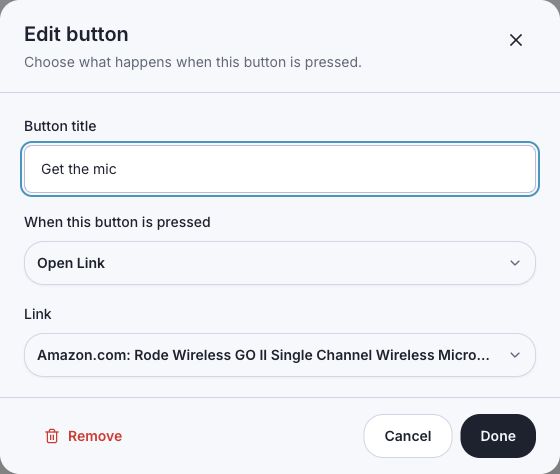
- Click the existing button in the Text block to open Edit button.
- Set Button title to Get the mic.
- Set When this button is pressed to Open Link.
- Under Link, choose your saved destination. Our demo uses Amazon.com: Rode Wireless GO II Single Channel Wireless Microphone System, Black : Cell Phones & Accessories.
- Click Done, close the step editor, and wait for Saved. Draft changes autosave; publishing is a separate action.
6. Check the workflow and preview the DM
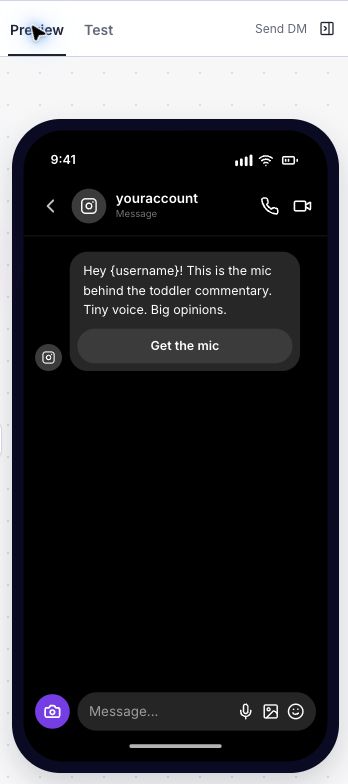
Preview is simulated and sends no messages. Workflow looks good confirms the graph check; it does not prove that Instagram is connected or that a real DM was delivered.
- Click Check in the workflow toolbar. Resolve any reported issues. This demo returns Workflow looks good.
- Open Preview with the eye control, then select Send DM to inspect the message and button.
- Check the wording and button label. Preview buttons do not open the destination; verify the selected Link in Edit button and test it in the real DM. The phone preview can show youraccount and the literal {username} placeholder when account or contact details are unavailable.
- Use Layout or Fit View if you need to see the full Trigger → Send DM → End path.
7. Test in Instagram, then publish
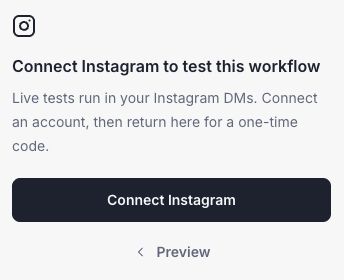
The demo account stops at Preview because its Instagram connection is inactive. The screenshot below shows the actual Test requirement. A Not published draft will not respond to ordinary comments; the one-time-code test is a separate draft-testing path.
- With an active Instagram connection and the draft saved, click Test. Live tests send real DMs.
- Use a different Instagram account. Scan the QR code or choose Open on this device, then send the one-time code shown in Test to start the draft workflow in Instagram.
- Confirm the DM arrives and Get the mic opens the intended destination. This checks the message path; it does not verify that a public comment matches the keyword.
- When the draft test and settings are ready, click Publish workflow. Confirm the automation is live.
- From the second Instagram account, leave a fresh test comment containing GEAR on a post included in the scope. Confirm the public reply, DM, and Link button all work.
- Return to Automations → Activity to inspect the run and delivery status. Use Analytics to review real trigger and click activity.
If the DM does not arrive
- Still Not published? Ordinary comments do not start a draft. Use the Test code for draft testing, or publish when ready for real comments.
- Connect Instagram notice? Reconnect the intended professional account under Settings → Integrations and check the required permissions.
- Wrong post or word? Confirm Words contains gear and that the comment is on a post included in All posts, Specific post, or Next post.
- Recently replied manually? Your conversation pause setting may temporarily pause automation replies.
- Pending delivery? Check Activity. A queued reply is not a delivered reply.
- Button opens the wrong page? Reopen Edit button and verify both Open Link and the selected Link, then publish the corrected draft when ready.
Missing commenter photos and follower details
A public comment does not grant access to the commenter's Instagram messaging profile. LinkStack keeps the comment and available username without repeatedly requesting restricted details. A DM, story reply, or message-button interaction lets LinkStack try to load the profile, including after an earlier consent denial. Previously available profiles can still be used. A missing photo or follower count does not block an otherwise eligible comment-triggered reply.
Reel and post thumbnails in Inbox
When a new Instagram comment enters Inbox, LinkStack saves its available reel or post thumbnail automatically. Later comments on the same cover reuse the saved image, so Instagram's expiring image URLs do not break that copy. This saves the cover image, not the reel video. Older comments are not updated. If Instagram no longer provides the image or saving fails, the comment still arrives, but its thumbnail may be missing.
GIFs in Inbox
Older saved GIF attachments are recognized from their original media information. Messages that were previously omitted are not restored automatically, and expired media can show an unavailable label. The native iOS app keeps the original attachment link; its image preview may be static, so open the attachment to view the animation.
- Open the conversation in the web Inbox and choose the image button beside the reply field.
- Choose a GIF up to 8 MB, review the attachment, and send it. LinkStack uploads the original file without cropping away its animation. Normal messaging-window limits still apply.
- Incoming GIFs and stickers play inline when Instagram supplies the media. If Instagram does not provide a preview, choose View in Instagram on the placeholder to open your Instagram inbox.
Sent message cards in Inbox
When Instagram returns a sent message as a structured card, Inbox shows the saved message text, optional image, and button labels instead of a generic File attachment. Images and buttons stay visible as historical content but are display-only in Inbox, so reviewing the conversation cannot register an automation click or act as the contact. Automated bubbles show Automation and the automation name; a generated AI workflow reply shows AI agent and the invoking automation name. LinkStack repairs older Instagram echoes only when they match a saved delivery exactly, while manual Instagram-app messages and unmatched history stay unlabeled. This also applies to older saved cards that were originally labeled as files. The iOS development build shows the same saved card content, with historical images and buttons kept inactive.
When a post takes off
- LinkStack queues comment-triggered private replies per connected Instagram account instead of firing the full spike at Meta.
- The queue uses a conservative 600-per-hour pace with short burst headroom, below Meta's stated 750-per-hour private-reply limit.
- If Meta still returns a rate limit, LinkStack automatically requeues that reply with backoff.
- Queued replies appear as Pending in recent automation activity. They are not counted as sent until Instagram accepts them.
- A queued reply is skipped if its one-time seven-day private-reply window expires before delivery.
Related articles
Still need help?
Support & feedback
Optional: keep earlier comments in context
Growth can retain unmatched public comments for up to 90 days and bring them into chat after the commenter becomes a contact. Configure Comment Memory under Settings → Integrations. If it is locked, Unlock with Growth opens the in-app upgrade prompt without navigating away.