
How to create, test, and send an email broadcast
Write one email for your subscribed contacts, test it, send it now, or schedule it in the right timezone.
9 min read
In this article
Before you start
- To reuse saved Audience filters, choose a segment under Recipients. Its current matching subscribed contacts are used when sending begins; exclusions and email preferences still apply.
- Open Settings, then Email.
- Save your sender name, contact email, and valid mailing address.
- Make sure the contacts you expect to reach are subscribed and have valid email addresses.
- Return to Dashboard, then open Broadcasts.
Write the broadcast
- Click New broadcast. Select recipients first: choose Everyone or one or more tags. Click the recipient count to review names and addresses. Turn on Exclude users to exclude tags, or use Exclude beside an address in the list. Remove excluded tags or addresses to restore them. Exclusions take priority and do not change anyone’s subscription. Click Continue to email.
- To reuse an email, choose Use a template, select a saved email card, review its subject and preview text, and click Use template. Search by template name or subject. This opens a new editable copy; changes to the subject, preview text, message, button, sender name, or reply-to do not change the saved template. If none are saved, choose Create a template. Saved reusable templates in Email → Templates also work in workflow Send Email steps and flows. Customer messages tied to events appear in the same library while retaining their triggers and protected links.
- Choose Write with AI to describe your email or pick an editable suggestion for an announcement, update, or product. Choose Generate first draft when ready, or Start blank to open the editor directly. AI generation uses AI credits; opening a template does not. Neither option saves or sends the broadcast.
- Open Email settings in the editor toolbar, then choose Everyone, one or more tags, or products under Memberships in Recipients. Memberships reaches current members of any selected product. Switching between tags and memberships replaces the previous inclusion selection. Click the recipient count at the top to review names and addresses. Turn on Exclude users to exclude tags, or use Exclude beside an address in the list. Remove excluded tags or addresses to restore them. Exclusions take priority and do not change anyone’s subscription.
- Use Recipients to go back before entering the editor; your prompt, template selection, recipients, and exclusions are preserved. After entering the editor, use Email settings to change recipients. Existing broadcasts reopen directly in the editor. If you start a broadcast from a template in the template library, choose recipients, then Continue to email opens the selected template.
- Check the sender name and reply-to email.
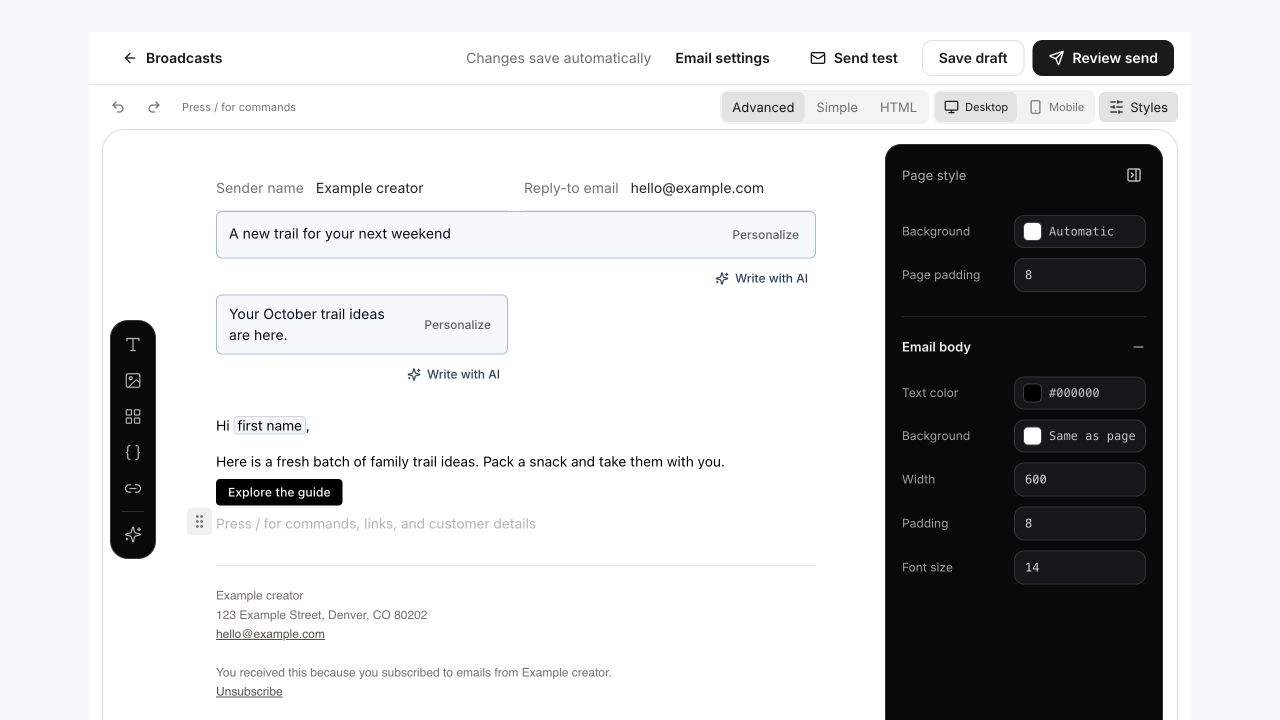
- Add a subject, optional preview text, and the message. The subject is also the broadcast title; blank drafts appear as Untitled broadcast. Use Personalize beside Subject or Preview text to search customer info, Links, or Products and insert at the saved cursor or replace selected text. These fields show sample-value chips while retaining the original tokens; their character limits count the full tokens. Advanced editor opens by default. Choose Simple editor for a compact toolbar; both modes keep the same full document, layout, macros, and undo history. In Advanced editor, use the Text blocks, Media, or Layout blocks menu in the left rail. Choose Search all content to search or switch groups in the popup. Type / in the message to search blocks and macros, such as /first, /links, or /products. Use the arrow keys and Enter to insert a result, or Escape to close. Empty text blocks show the command hint. Personalize also inserts chips in the canvas and supported content fields. Hover over a chip to see its macro name. Link opens Display text and Destination for selected text or buttons; image links edit the destination only. Enter a URL or choose a saved Link/Product through Personalize destination, then click Add link or Save link. Cancel changes nothing, and Remove link keeps the content and styles. Use the style sidebar to adjust colors, spacing, and width; on smaller screens, open it with Email styles. Leave page Background on Automatic and body Background on Same as page for a transparent email. A separate body color overrides the page; use the reset control beside a chosen color to restore the default. The canvas is the live preview: click the email text to edit in place. Desktop and Mobile resize the same editable email. Your protected mailing address and unsubscribe link appear below the message automatically. Save the draft to keep the layout.
- Select an image and drag an edge handle to resize it proportionally. Use Email styles for its source, alt text, dimensions, and alignment. Replace image keeps the current image until the upload succeeds. Image link opens the same destination dialog, preserving alt text and dimensions; choose Add link or Save link to apply it.
- Drag a block by its grip to rearrange it, or click the grip for Move up, Move down, Duplicate, Delete, and Turn into. Select parent block to move an entire section or column layout. Edit with AI previews a draft for the selected text block; Write with AI previews a draft for the message. Review it before choosing Insert, Replace, or Cancel. Insert keeps existing content and adds after the selected block or at the saved cursor. Replace updates the targeted block or full message. Cancel changes nothing; Undo restores an accepted change.
- Media includes linked YouTube thumbnails, X post previews with pasted author/text, and bar charts with editable series, colors, and values. Layout blocks includes tables, 2 to 4 columns, social links, code, and HTML import. HTML becomes editable blocks; scripts, embeds, and custom CSS are removed. Unsubscribe footer reveals the protected footer already included in the email.
- For source editing, choose HTML in the toolbar, then Edit HTML. Review the compatibility warning and edit the body markup while keeping its block attributes and personalization tokens. The live preview shows the converted result. Unsupported markup and stylesheet CSS may be removed. Choose Simple or Advanced to apply the supported HTML and keep editing, or choose Apply changes. Each applies one undoable edit. If conversion fails, the HTML stays open with your edits intact. Cancel discards pending code changes. Copy copies the editable source. Switch back or apply before sending a test; templates and drafts autosave the applied content. Page styles, sender fields, and the protected footer remain outside the source.
- Type /button or choose Button from Layout blocks to add a button directly in the email. Older saved footer buttons become editable blocks when you open their message.
- Select the button and open Link. Edit Display text if needed, paste a Destination or choose a saved Link or Product with Personalize destination, then click Add link or Save link. Choosing a new destination keeps the current label unless you edit it.
- Review the live email preview, including the sender footer.
- Changes save automatically, including recipients, setup choices, generated content, and editor changes. Check All changes saved before leaving; use Retry if a save fails. Save draft remains available to save immediately.
Send a test
- Choose Send test in the editor toolbar. Fill any highlighted fields first: subject, message, sender name, and a valid reply-to address are required. Subject is required for tests, and an image-only message is valid. Sender name and reply-to default from Settings → Email → Sender details unless you saved an override in the message. Enter up to five addresses separated by commas or line breaks, and optionally edit Test variables to try different sample values.
- Click Send test to send the current message only to those addresses. You can also test reusable and customer email templates from their editor toolbar.
- Open the email and check the subject, preview text, line breaks, button, reply-to address, and sender footer.
- Confirm the footer says this is a test and that no subscribers were contacted.
- Click Unsubscribe and confirm the test page opens. The test link does not change anyone's subscription.
Send now
- Click Review send.
- Choose Send now.
- Click View recipients beside Eligible recipients to check names and email addresses. Use Next and Previous to browse larger audiences, then close the list. LinkStack checks eligibility again when sending starts.
- Click Send broadcast. Sending cannot be cancelled after it begins.
Schedule for later
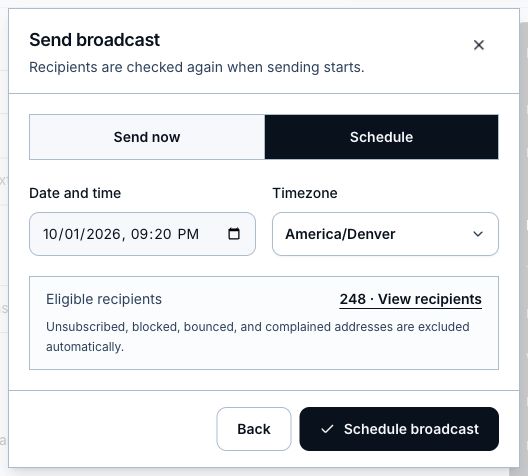
- Click Review send and choose Schedule.
- Choose the date and time.
- Choose the timezone the date and time should use.
- Pick a time at least 30 seconds in the future.
- Review the eligible recipient count, then click Schedule broadcast.
Edit, reschedule, or cancel
- Draft and scheduled broadcasts can be edited.
- Open a scheduled broadcast, make the changes, then click Reschedule to save a new send version.
- Click Cancel send before delivery begins if the broadcast should not go out.
- Once sending begins, content becomes read-only and the broadcast cannot be cancelled.
Duplicate or delete a broadcast
- Return to Broadcasts and open the three-dot menu beside the email.
- Choose Duplicate to open a new draft with the same subject, message, sender fields, audience, and exclusions. Review and save any changes before sending. The copy starts with no schedule, recipients, or results.
- Choose Delete, then confirm Delete broadcast to remove it from the dashboard. Deleting a scheduled broadcast also cancels its send. Sending broadcasts must finish first. Deletion cannot be undone and does not recall delivered emails or delete audience contacts.
Read broadcast results
- Sent shows the number of emails sent, their delivered rate, and any failed deliveries.
- Opens and Clicks show the number and percentage of recipients with recorded activity. Repeat opens or clicks count once per recipient. Bounce / Spam shows bounce and spam-complaint rates.
- All percentages use sent emails as the denominator. Drafts start at zero. Metrics update as provider events arrive; untracked activity is not included, so zero recorded opens or clicks does not prove no activity occurred.
Who receives the broadcast
- Choose Everyone, tags, or products under Memberships in the Recipients picker. Multiple tags include contacts matching any selected tag. Multiple memberships include current members of any selected product, across all tiers. Click the count at the top to see current matching names and email addresses. Each email appears once. The list also opens from Review send. Exclude users removes contacts with selected tags; Exclude beside an address removes that address from this broadcast. Exclusions win over inclusion, including duplicate contacts with the same address. Removing exclusions restores eligibility without changing subscription status.
- Membership audiences include active, trialing, and past-due members who retain access. Scheduled cancellations stay included until access ends. Paused, unpaid, pending, expired, and canceled memberships drop out. Membership status is checked when the broadcast starts and again before each email sends; historical purchase tags are not used for this check.
- Choosing a tag replaces the membership selection, and choosing a membership replaces included tags. Exclusions stay in place. Removing the last membership requires choosing a new audience before saving or sending. Members who join or reactivate after sending starts qualify for future broadcasts rather than being added to the current send.
- Only contacts with a valid primary email and a subscribed email status are eligible.
- New contacts who submit an email through a LinkStack form, product checkout, appointment, or automation email collection start subscribed by default. They do not need to complete a second signup form.
- Imports default blank subscription statuses to subscribed; you can choose unsubscribed instead. Explicit imported opt-outs and existing unsubscribes are kept. A configured checkout consent checkbox or an automation with email opt-in turned off still controls whether that capture subscribes the contact. Media-kit access and partnership-inquiry emails appear in Audience as transactional contacts but do not subscribe someone. Complimentary access alone does not subscribe someone.
- Submitting another form or making another purchase does not reset a previous unsubscribe or block.
- Unsubscribed, blocked, deleted, bounced, complained, and suppressed contacts are excluded automatically.
- Eligibility is checked again for each recipient before delivery, so the final sent count can be lower than the number shown while editing.
- Every delivered broadcast includes an unsubscribe link.
Troubleshooting
- If a mailing address is missing, complete the popup when you test or send. Saving resumes the test or returns you to send review; you still confirm the audience and timing before sending. You can also edit the address in Settings → Email.
- Invalid button link: open Link, enter display text and a full http:// or https:// destination, or choose an available Link/Product through Personalize destination. Fix the destination before clicking Add link or Save link.
- No eligible recipients: check the contact's email status in Audience. Captured emails normally start subscribed, but media-kit access and inquiry contacts remain transactional until they separately opt in. Explicit opt-in settings, an imported Unsubscribed status, earlier opt-outs, blocks, and delivery suppressions can also exclude them. Refresh the broadcast after collecting new emails.
- Subject or message missing: both are required before sending even though a draft can be saved earlier.
- Scheduled time rejected: choose a valid timezone and a time at least 30 seconds ahead.
- Delivery count is lower than expected: a recipient may have unsubscribed, bounced, complained, been blocked, or become suppressed before delivery.
Related articles
Still need help?
Support & feedback