
How to create and publish an appointment
Create a booking page, set the meeting details and availability, then test the booking process.
In this article
Before you start
An appointment needs a meeting location and at least one available weekly window before it can be published. You can use a ready meeting integration, a custom HTTPS meeting link, or Share details separately. Paid appointments also need Stripe to show Payments ready.
Build the booking page
- Open Dashboard, then Products.
- Click New product and choose Appointment.
- On Product, add the title and booking URL. On Landing page, customize Appearance and use Page content for the description, images, and videos.
- Expand Checkout to set the button copy and ask any customer questions needed before the meeting.
Set the price and duration
- Open Product → Pricing and choose a free or paid price.
- Add an optional original price, discount code, or sales limit.
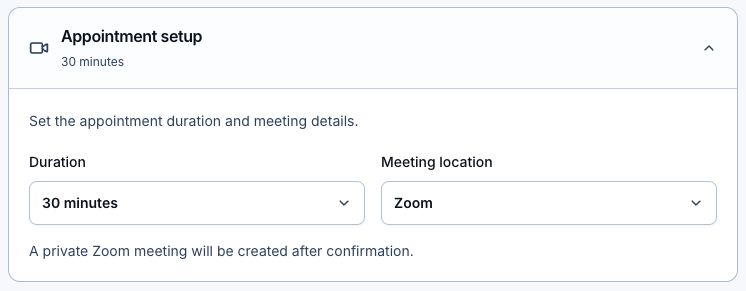
- Under Product, expand Appointment setup.
- Choose the appointment duration.
- Choose a meeting location from the options currently ready for your account.
- If you choose Custom meeting link, enter a complete https:// URL. Choose Share details separately when you will send the location yourself.
Set availability
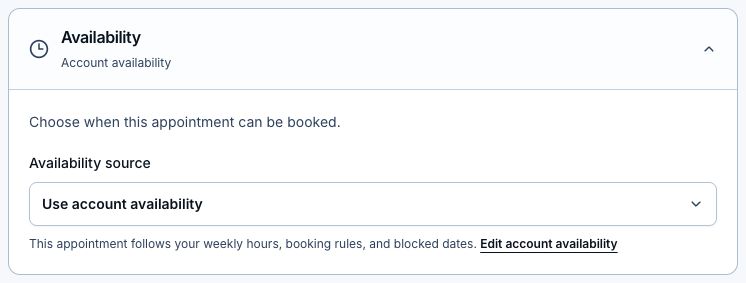
- Under Availability, choose Use account availability to reuse your default weekly hours and booking rules.
- Choose Custom availability for this appointment when it needs different hours, notice, start times, or buffers.
- Set minimum notice, booking window, start-time interval, and buffers before and after the meeting.
- Enable at least one day and add the weekly time windows customers may book.
- Remember that account-level blocked dates still apply to a custom appointment schedule.
Publish and test
- Preview the page and click visible content to confirm Product details, Landing page content, and Settings are correct.
- Click Publish.
- If publication is blocked, add availability, finish the selected meeting integration, or fix the custom meeting link named in the message.
- Open the standalone product page in a new tab and copy that link when you want to share the appointment directly. A bio page is not required.
- Switch the displayed timezone, choose an available calendar day, then choose one of that day's times and complete a free or test booking.
- Confirm the appointment appears under Products → Appointments. Add it to a bio only when you also want a booking card there.
Show available days on your bio
- Add the published appointment to your bio and open its card in the bio editor.
- Keep the card outside a collection, then open Card → Format and choose Calendar.
- Optionally change the button text and color. The calendar uses your bio colors, and the editor shows labeled sample availability.
- Save the bio and open its public page. Click an available day to open the appointment page with that day selected and its times in view.
- Check the displayed timezone, pick a time, and continue to checkout. Use the back arrow to choose a different day.
- Live calendar cards load the next 31 days of availability. Only days with open times are clickable.
- If a day fills up before the product page loads, the customer can choose another date.
- The booking button opens appointment availability; Learn more follows the card's configured destination. Collection cards keep their collection layout.
What the customer receives
- A confirmation email with the appointment time and available meeting details.
- An Add to Google Calendar action that opens a pre-filled event in a new tab.
- A Download .ics option and ICS attachment for Apple Calendar, Outlook, and other calendar apps.
- A secure link to reschedule or cancel an upcoming appointment.
- Reminder emails 24 hours and 1 hour before the start time.
- Updated messages after a reschedule or cancellation.
Add the appointment to a calendar
- Open the secure booking-management link from the confirmation or reminder email.
- Click Add to Google Calendar to open a new tab with the current appointment title, time, location, and details filled in.
- Review the event in Google Calendar and click Save.
- For Apple Calendar, Outlook, or another calendar app, click Download .ics and open the downloaded file.
- After a reschedule or cancellation, use the latest email or booking-management page to keep the calendar copy current.
Rescheduling, cancellations, and refunds
A customer can open the booking-management link, choose an available calendar day, choose a new time, review it, and confirm before the appointment changes. When you reschedule from the dashboard, add a reason if the customer needs context; it is optional and appears in the update email. LinkStack then emails the customer the new time and updated meeting details. Cancellation releases the time. It does not automatically refund a paid booking, so review the Stripe payment separately when a refund is appropriate.
Troubleshoot empty availability
- Confirm the appointment is Published and the selected schedule contains weekly hours.
- Check the visitor timezone, minimum notice, and how far ahead bookings are allowed.
- Check whether duration, start-time intervals, or buffers leave enough room inside each window.
- Review blocked dates, existing LinkStack appointments, and connected-calendar conflicts.
- Reconnect the meeting integration or choose another location if the public page says calendar or video availability is unavailable.
Related articles
Still need help?
Support & feedback