
How to create and manage a membership
Set recurring tiers, choose how members receive access, publish the offer, and manage billing after people join.
8 min read
In this article
Before you start
A membership is a recurring product, not a downloadable file. Decide what each tier includes, how often it bills, and whether LinkStack should show an access link immediately or wait for you to fulfill access. Paid checkout needs Stripe to show Payments ready.
Create the membership
- Open Dashboard, then Products.
- Click New product and choose Membership.
- On Product, add the title and URL. On Landing page, customize Appearance, then write text and add images or videos in Page content.
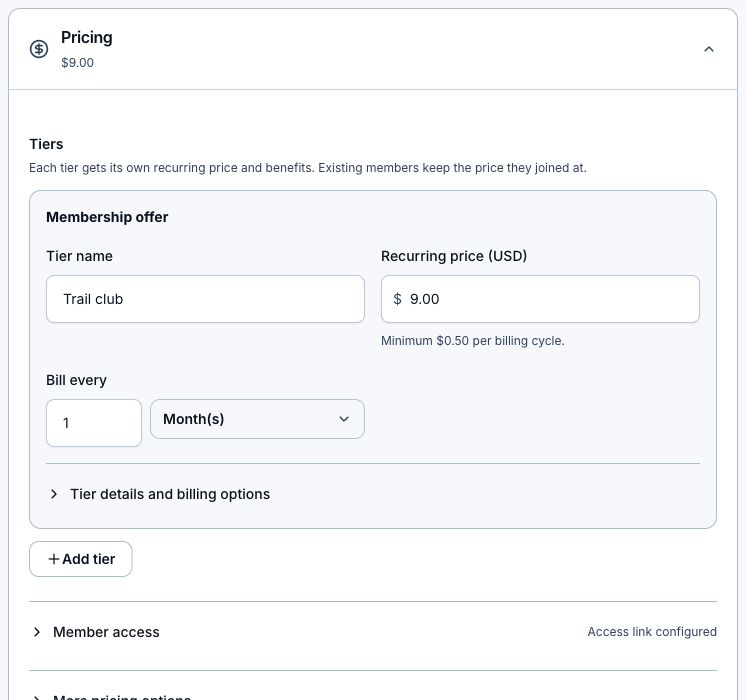
- Open Product → Pricing and give the first tier a unique name, recurring price, and billing interval. Names and prices start empty for every new tier. Expand Tier details and billing options for its description, benefits, and fixed term.
- Click Add tier when the membership needs another option. A membership can have up to 10 tiers.
- Add an optional original price, sales limit, or discount code when it fits the offer.
- Choose whether each tier renews until canceled or ends after a set number of billing cycles.
Set up member access
- Expand Member access under Product → Pricing. Turn on Creator fulfills access when you manually add people to Discord, a private group, coaching, or another service.
- Leave it off when the saved access link and instructions are enough to fulfill the membership automatically.
- Add a complete http:// or https:// access link when members should open a private destination.
- Write clear access instructions explaining what happens after checkout.
- Open Settings → Membership emails to choose whether LinkStack sends renewal receipts, failed-payment notices, and cancellation confirmations.
Finish the page and emails
- Open Landing page and expand Checkout to edit the button copy and customer questions.
- Open Settings → Welcome email and enable the welcome message. Use Access Details, Membership Details, Billing Amount, and Manage Membership Link for membership personalization. Restore default uses membership copy; memberships do not deliver a product-file download.
- Preview each tier and the checkout section.
- Click Save as Draft if the offer is not ready, or Publish when it can accept members.
- Open the public product page and run a real checkout test before sharing it widely.
What members receive
- The enabled welcome message includes the configured access details, recurring billing information, and a secure membership-management link. If the account has a Membership welcome override under email templates, that copy takes precedence over the product message.
- A creator-fulfilled member stays pending until you mark access Fulfilled from the membership dashboard.
- The management page lets a member update payment details, schedule cancellation, or reactivate a pending cancellation.
- Fixed-term tiers end automatically after their configured number of complete billing cycles.
- If an active member missed the welcome message, open the member from the membership dashboard and choose Resend welcome. A failed send shows an error instead of silently reporting success.
Manage members
- When members need manual access, open Dashboard and click Review members beside the membership in the members awaiting fulfillment queue. This opens the matching members directly. The queue includes current access awaiting fulfillment, regardless of the dashboard date range; incomplete and expired checkouts do not count.
- You can also open Products and select the membership. Search by name, email, or tier, or choose Awaiting fulfillment or a billing status from the member filter.
- Open a member to edit customer details, copy a billing link, open the Stripe portal, or resend the welcome email.
- For creator-fulfilled access, click Mark fulfilled after access is ready. The member leaves the Awaiting fulfillment filter and the dashboard count updates when you return.
- Pause, resume, schedule cancellation, keep a canceling membership active, or cancel access immediately as needed.
- Review invoice history and choose the payment you want to refund.
Refunds and cancellations are separate
Refunding an invoice does not cancel the recurring subscription. Canceling a membership does not refund earlier invoices. When both should happen, perform both actions and verify the final member status.
Troubleshooting
- A tier must cost at least $0.50 per billing cycle.
- Every tier needs a different name, and an original price must be higher than the recurring price.
- An access link must be a complete http:// or https:// URL.
- If checkout is unavailable, confirm the membership is Published, Stripe shows Payments ready, an active tier is available, and the sales limit has not been reached.
- If access still says it is being prepared, mark the member Fulfilled or turn off Creator fulfills access when manual approval is not needed.
Related articles
Still need help?
Support & feedback